Kubernetes Quick Guide
Quick guide to Kubernetes, coz I often refer to it
PersonalRandom Access MemoriesResource
7223 Words | Reading Time: 32 Minutes, 49 Seconds
20-01-2025 12:00 AM UTC
Kubernetes Architecture
- Master
Api Server: Gateway to the cluster. Also acts as a gatekeeper for authentication (to make sure that only authorized requests get through the cluster)Cloud Controller Manager: Connects on-premise cluster to cloudController Manager: detects cluster state changes & recovers cluster state ASAP.Scheduler: Selects appropriate node to create the pod. Note here that Scheduler just decides on which node to schedule. It is kubelet that starts the pod.ETCD: Cluster Database (the cluster state that Controller manager checks & resources that Scheduler decides based on them are all stored in etcd)
- Worker
kubelet: used to deploy and start an object (like pod) on local nodes.kube-proxy: forwards requests from services to pods. request → service → kube-proxy → pod
Terminology
- Node : Hosts that run Kubernetes applications
- Containers : Units of packaging
- Pods : Containers are not managed individually; instead, they are part of a larger object called a Pod. A Pod consists of one or more containers which share an IP address, access to storage and namespace.
- Namespace : Kubernetes uses namespaces to keep objects distinct from each other, for resource control and multitenant considerations.
- Service : Collection of pods exposed as an endpoint
- Deployment : a deployment file can define the number of copies (or replicas, as they’re known in Kubernetes) of a given pod. Or a deployment can upgrade an existing pod to a new application version by updating the base container image.
- CRI (Container Runtime Interface): CRI is an interface that k8s uses to talk to different container runtimes (docker, containerd, cri-o, …). CRI is a set of tools that define what container runtime must implement & how it should be implemented to be pluggable to kubernetes as a container runtime.
Kubelet --> CRI --> Container Runtime
Docker did not implement CRI rules. K8s added dockershim layer to support docker:
kubelet --> CRI --> dockershim --> Docker
kubernetes Installation
- To install on both master & worker:
- Container runtime
- Kubelet
- Kube-proxy
- To install on master:
- api-server
- scheduler
- controller-manager
- etcd (all master components are deployed as static pods)
- Certificates: we should generate a self-signed CA certificate for the whole cluster & sign all other component certificates with it.
Regular pod scheduling : API Server gets request → scheduler selects node → kubelet schedules pods Static Pod Scheduling: kubelet directly schedules static pods (by watching a specific loc: “/etc/kubernetes/manifest”)
Kubeadm
(kubeadm is a command-line tool used for bootstrapping a best practice k8s cluster)
For this purpose, we need to
1. install kubeadm on each node first,
2. then run $kubeadm init command (only once on one of the master nodes)
Kubeadm init phases:
Preflight :
- checks to validate the system state before making changes.
- Also pulling images for setting up k8s cluster
Certs :
- Create
/etc/kubernetes/pkidirectory. - generates a self-signed CA to setup identities for each component in the cluster.
- apiserver.crt: used for others to connect and authenticate to apiserver.
- ca.crt: self-signed CA of kubernetes. (signs other certificates)
- /etc/kubernetes/pki/etcd: contains etcd certificates.
- Create
Kubeconfig :
- Creates
/etc/kubernetesdir (dir for config files). - for every client that needs to talk to apiserver, kubeconfig file will be generated (just like admin user). Creates admin.conf (kubeconfig file for admin user), kubelet.conf, controller-manager.conf, scheduler.conf in /etc/kubernetes dir.
- Creates
Kubelet-start :
- Creates
/var/lib/kubelet/config.yamlfolder - Writes kubelet settings (to above folder) and (re)start kubelet.
- Creates
Control-plane :
- Creates manifest folder /etc/kubernetes/manifest for static pods.
- Creates static pod manifests. These pods will be scheduled by kubelet and will use kubeconfig files with certificates to talk to each other or apiserver.
Add-ons :
- Installs DNS Server (CoreDNS)
- Installs kube-proxy via apiserver
Access cluster after Configuration
Access k8s cluster == access api-server (api-server is the entry point to the cluster)
To connect to the cluster, we need:
- Install kubectl: command line to connect to the cluster 2. Kubeconfig file: to Authenticate with cluster
The kubeconfig file contains:
- Api server Address
- Admin’s certificates & private key (users.user.client-certificate-data , users.user.client-key-data)
kubectl precedence of kubeconfig file:
- File passed with –kubeconfig flag ($kubectl get nodes –kubeconfig /etc/kubernetes/admin.conf)
- KUBECONFIG environment variable ($export KUBECONFIG=/etc/kubernetes/admin.conf)
- File located in “$HOME/.kube/config” folder (default location where kubectl looks for)
Create a Yaml file :
Note that this file consist of 4 basic instruction:
apiVersion: v1# This should be find from the output of below command
$ kubectl api-versions | grep -E "^apps/"
kind: Pod# kind of object we are creating.metadata:# data about data (the name of object, namespace and label of object are defined in this part)
name: firstpod
spec:#The data that is for create of object(deployment, service,…).
containers:
    - image: nginx
      name: stan
Pod yaml file:
apiVersion: v1
kind: Pod
metadata:
    name: firstpod  #name of pod
spec:
    containers:
    - image: nginx  #base image of container
      name: stan    #container name
Kubectl Commands
Debug commands:
Kubectl get:
- $
kubectl get objectE.g: kubectl get pod - $
kubectl get pod podname -o yaml > mypod.yaml#create yaml file from existing pod - $
kubectl get pod podname -o wide#see detail of a pod - $
kubectl get pod podname -w#see online updates - $
kubectl get pods --all-namespaces#see all pods in all namespaces - $
kubectl get -f pod.yaml -o json#List a pod identified by type and name specified in “pod.yaml” in JSON output format
- $
Kubectl describe: Show details of a specific resource or group of resources. $
kubectl describe objectE.g:
- Describe a node
$ kubectl describe nodes kubernetes-minion-emt8.c.myproject.internal $ kubectl describe pod <podname>- Describe a pod identified by type and name in “pod.json”
$ kubectl describe -f pod.jsonKubectl logs:
- Return snapshot logs from pod nginx with only one container
$ kubectl logs nginx- Return snapshot of previous terminated ruby container logs from pod web- 1
$ kubectl logs -p -c ruby web- 1
kubectl version: print the client and server version information.
$ kubectl version
- kubectl api-versions: Print the supported API versions on the server, in the form of “group/version”.
$ kubectl api-versions
- kubectl cluster-info: Display cluster info.
$ kubectl cluster-info
kubectl explain: Documentation of resources
E.g: Get the documentation of the resource and its fields
$ kubectl explain podskubectl cordon: This will mark the node as unschedulable and prevent new pods from arriving.
$ kubectl cordon worker
- kubectl uncordon:
$ kubectl uncordon worker
- kubectl drain: This will mark the node as unschedulable and also evict existing pods on the node.
$ kubectl drain worker
E.g:
- Set the node labelled with name= ek8s-node as unavailable and reschedule all the pods running on it:
bash $ kubectl drain ek8s-node --delete-local-data -ignore-daemonsets --force
- kubectl run:
$ kubectl run podname --image=image-name
- kubectl create (e.g. Deployment):
- Imperative:
$ kubectl create deployment <dpname> --image=<imagenme>- Declarative:
E.g: Create a pod based on the JSON passed into stdin.$ kubectl create -f file.yml #there is a yaml file$ cat pod.json | kubectl create -f - Debug deployment:
    $ kubectl get deployment dp
    $ kubectl get deployment --all-namespaces
    $ kubectl describe deployment dp1
- kubectl Apply:
E.g:
- Apply the configuration in pod.json to a pod.
bash $ kubectl apply -f ./pod.json - Apply the JSON passed into stdin to a pod.
bash $ cat pod.json | kubectl apply -f
- kubectl delete:
$ kubectl delete pod <podname>
$ kubectl delete -f <yaml file>
$ kubectl delete pod <podname> --grace-period=0 #force delete of a pod in kubectl<=1.4
$ kubectl delete pod <podname> --grace-period=0 --force #force delete of a pod in kubectl>=1.5
- kubectl exec: to execute a command inside a container.
$ kubectl exec <podname> -c <containername> --<command>
E.g:
- $kubectl exec mypod -c busybox --echo “Hello!”
- $kubectl exec web-server2 -c redis2 -it -- bash
- kubectl replace: Replace a resource by filename. The replace command behaves kind of like a manual version of the edit command.
E.g:
- Replace a pod using the data in pod.json.
bash $ kubectl replace -f ./pod.json - Force replace, delete and then re-create the resource
bash $ kubectl replace --force -f ./pod.json
- kubectl edit: The edit command allows you to directly edit any API resource you can retrieve via the command line tools. It opens the yaml file of the running resource or object.
E.g:
- Edit the deployment named my-deployment and changes replicas from 3 to 15:
bash $ kubectl edit deployment my-deployment Now it opens the yaml file of this running deployment and you can change it live.
kubectl attach: Attach to a running container E.g:
- Get output from running pod 123456-7890, using the first container by default.
$ kubectl attach 123456-7890- Get output from ruby-container from pod 123456- 7890.
$ kubectl attach 123456- 7890 - c ruby-containerkubectl expose: Take a replication controller, service or pod and expose it as a new Kubernetes Service
E.g:
- Create a service for a pod valid-pod, which serves on port 444 with the name “frontend”
bash $kubectl expose pod valid-pod --port=444 --name=frontend - Create a service based on nginx service already existing, exposing the container port 8443 as port 443 with the name “nginx-https”
bash $kubectl expose service nginx --port=443 --target-port=8443 --name=nginx-https
kubectl label: Update the labels on a resource E.g:
- Update pod ‘foo’ with the label ‘unhealthy’ and the value ’true’.
$kubectl label pods foo unhealthy=true- Update pod ‘foo’ with the label ‘status’ and the value ‘unhealthy’, overwriting any existing value.
$ kubectl label --overwrite pods foo status=unhealthy- Update all pods in the namespace
$ kubectl label pods --all status=unhealthy- Update pod ‘foo’ by removing a label named ‘bar’ if it exists. Does not require the –overwrite flag.
$ kubectl label pods foo barkubectl scale: Set a new size for a Replication Controller, Job, or Deployment.
- Scale replication controller named ‘foo’ to 3.
$ kubectl scale --replicas=3 rc/foo- Scale a resource identified by type and name specified in “foo.yaml” to 3.
$ kubectl scale --replicas=3 -f foo.yaml- If the deployment named mysql’s current size is 2, scale mysql to 3.
$ kubectl scale --current-replicas=2 --replicas=3 deployment/mysql- Scale multiple replication controllers.
$ kubectl scale --replicas=5 rc/foo rc/bar rc/baz- Scale job named ‘cron’ to 3.
$ kubectl scale --replicas=3 job/cron
Label
By default, creating a Deployment with “kubectl create” adds a label with the name of deployment.
Set label: in YAML file:
- Imperative:
$ kubectl label pod <podName> image=nginx # label is image=nginx- Declarative:
Labels:
    app:test
view pods with a Label:
$ kubectl get pod -l app=test00 #pods with app=test00 label
$ kubectl get pod -L app #pods with app label
- view labels of all pods
$kubectl get pods --show-labels
Namespace
Namespace is a virtual cluster. When you create a pod related to USSD product for example, it should be created in USSD namespace.
Context
When a user logs in to the namespace of a cluster, its called Context. Context is a user in the namespace of a cluster.
Namespace commands:
- Create namespace:
- Imperative:
$kubectl create ns test - Declarative:
$ kubectl create ns test2 --dry-run=client -o yaml > test2.yaml $ kubectl create -f test2.yaml - Imperative:
- List namespaces:
$ kubectl get ns
- List all pods in all namespace:
$ kubectl get pods --all-namespaces
- Start a Pod in a namespace:
$ kubectl run nginx5 --image=nginx -n test
- List Pods in a namespace:
$ kubectl get pod --namespace test
$ kubectl get pod -n test
- List all the resources that are not bound to a namespace
$ kubectl api-resources -namespaced=false
- To change the context and namespace both
$ kubectl config set-context --current --namespace=kube-system
- NameSpace yaml file:
apiVersion: v1
kind: Namespace
metadata:
    name: ns
Deployment
Deployment has benefits over pod:
- Scale up & down: with “replica” argument.
Two ways to make scale a deployment:
- Imperative:
$ kubectl scale deployment.v1.apps/my-deployment --replicas= 5- Declarative: in the YAML file:
spec: replicas: 5 - Rolling Update & RollBack: We have two Upgrade strategies:
- Recreate (causes downtime)
- Rolling update
- Two ways to Upgrade a deployment:
- Imperative:
$ kubectl set image deployment <dpName> nginx=nginx:1.9.1- Declarative: in the YAML file:
containers: - image:nginx:1.9.1 - Check history of deployments:
$kubectl rollout history deployment <dpName>- Rollback to the previous deployment
$ kubectl rollout undo deployment test- Rollback to a specific revision
$ kubectl rollout undo deployment test --to-revision=2- Mark the nginx deployment as paused. Any current state of the deployment will continue its function, new updates to the deployment will not have an effect as long as the deployment is paused.
$kubectl rollout pause deployment/nginx- Resume an already paused deployment
$ kubectl rollout resume deployment/nginxMax Surge: Deployment ensures that only a certain number of Pods are created above the desired number of Pods. By default, it ensures that at most 125% of the desired number of Pods are up (25% max surge).
Max Unavailable: Deployment ensures that only a certain number of Pods are down while they are being upated. By default, it ensures that at least 75% of the desired number of Pods are up (25% max unavailable).
Deployment yml file: (Note: Template is the config of a Pod inside a deployment.(it has its own labels, …))
apiVersion: apps/v1 kind: Deployment metadata: name: nginx-deployment labels: #deployment label app: nginx spec: replicas: 3 selector: matchLabels: app: nginx template: metadata: labels: #container label app: nginx spec: containers: - name: nginx image: nginx:1.14.2 ports: - containerPort: 80- ReplicaSet yaml file (same as deployment yaml file):
apiVersion: v1
kind: ReplicaSet
metadata:
    name: rs-example
spec:
    replicas: 3             #how many copies?
    selector:
        matchLabels:
            app: nginx      #select pods with label: app:nginx & env: prod
            env: prod
    template:
        <pod template>      #like yaml of pod. Image & other info about pod
DaemonSet
A DaemonSet makes sure that all of the Nodes in the Kubernetes Cluster run a copy of a Pod.
Some typical uses of a DaemonSet are:
- running a log collection daemon on every node
- running a node monitoring daemon on every node
DaemonSet yaml file:
apiVersion: apps/v1
kind: DaemonSet
metadata:
    name: my-daemonset
spec:
    selector:
        matchLabels:
            app: my-daemonset
    template:
        metadata:
            labels:
                app: my-daemonset
    spec:
        containers:
            - name: nginx
            image: nginx:1.19.1
Metric Server
In order to view metrics about the resources pods and containers are using, we need an add-on to collect and provide that data. such add-on is Kubernetes Metrics Server.
Installation:
$ vim metric.yaml
$ kubectl apply -f metric.yaml
Commands:
$ kubectl top pod <podname> --sort-by=cpu #use --sort-by option to select resource
$ kubectl top pod <> --sort-by=cpu --all-namespaces #see pods in all namespaces
$ kubectl top node --sort-by=memory #see nodes resource usage
$ kubectl top pod <> --sort-by=cpu --selector name=app #--selector to specify a label
Volumes
Kubernetes Storage Requirements:
- Storage that doesn’t depend on the pod lifecycle.
- Storage must be available on all nodes.
- Storage needs to survive even if cluster crashes!
Persistent Volume(PV):
A volume that its lifetime is about clusters lifetime and will not be destroyed after pod stops.
PV is connected to pod through PVC (Persistent Volume Claim). Note that PV is not namespaced.
PV yaml file:
apiVersion: v1
kind: PersistentVolume
metadata:
    name: task-pv-volume
    labels:
        type: local
spec:
    storageClassName: standard              #in case u have longhorn u can set it to longhorn
    capacity:
        storage: 100Mi                      #capacity.storage: The total amount of available storage.
    volumeMode: Filesystem #The type of volume, this can be either Filesystem or Block.
    persistentVolumeReclaimPolicy: Retain   #The behaviour for PVC s that have been deleted. Options include:Retain=manual clean up,Delete=storage asset deleted by provider.
    storageClassName: slow                  #Optional name of the storage class that PVC s can reference. If provided, ONLY PVC s referencing the name consume use it.
    accessModes:                            #A list of the supported methods of accessing the volume. Options include:
        - ReadWriteOnce                     #RWO means only a single pod will be able to (through a PVC) mount this. ROM means volume is Read-Only by many pods. RWM means, well, many pods can mount and write.
    mountOptions:                           #Optional mount options for the PV.
        - hard
        - nfsvers=4.
    hostPath:
        path: "/mnt/"
PVC yaml file:
apiVersion: v1
kind: PersistentVolumeClaim
metadata:
    name: pv-volume
spec:
    storageClassName: standard
    resources:
        requests:
            storage: 10Mi                  #resources.requests.storage : The desired amount of storage for the claim (can be <= capacity of PV)
    accessModes:                            #This MUST be a subset of what is defined on the target PV or Storage Class.
        - ReadWriteOnce
    volumeMode: Filesystem
PV, PVC & Pod yaml:
Note that to define volume in a pod u have to
- Define volumes on pod level ( volumes: ). It is in the form of Name+Type
- Mount volume into container( volumeMounts: )
apiVersion: apps/v1
kind: Deployment
metadata:
    name: my-db
    labels:
        app: my-db
spec:
    replicas: 1
    selector:
        matchLabels:
            app: my-db
    template:
        metadata:
            labels:
                app: my-db
        spec:
            containers:
                - name: mysql
                  image: mysql:8.0
                  volumeMounts:
                    - name: db-data
                      mountPath: "/var/lib/mysql"
            volumes:
            - name: db-data
              persistentVolumeClaim:
                claimName: mysql-data-pvc
apiVersion: v1
kind: PersistentVolume
metadata:
    name: data-pv
spec:
    hostPath:
        path: "/mnt/data"
    capacity:
        storage: 10Gi
    accessModes:
        - ReadWriteMany
apiVersion: v1
kind: PersistentVolumeClaim
metadata:
    name: mysql-data-pvc
spec:
    resources:
        requests:
            storage: 5Gi
    accessModes:
        - ReadWriteMany
Common Types of volumes: Ephemeral, Persistent Volume(PV), Emptydir, hostPath, StorageClass
| TYPE OF VOLUME | LIFETIME |
|---|---|
| VOLUME(EPHEMERAL VOLUME) | Pod lifetime |
| PV | Cluster lifetime |
| CONTAINER FILE SYSTEM | Container lifetime |
Ephemeral Volume: for apps that need storages that is not important after restart. E.g: cache server
Types of Ephemeral Volumes: emptydir, configMap, Secret Advantage: pods can restart or stop without dependency to storage.
EmptyDir:
In pod yaml file, spec.volumeMounts is about containers spec, and spec.volumes is about pod spec.
We specify types of volumes (emptyDir, hostPath,…) in spec.volume.
EmptyDir yaml file:
apiVersion: v1
kind: Pod
metadata:
    name: test-pd
spec:
    containers:
        - image: registry.k8s.io/test-webserver
          name: test-container
          volumeMounts:                         #volumeMount is about container & u can see its under spec.container
          - mountPath: /cache                   #path of volume in containers of the pod
            name: cache-volume
    volumes:                                    #volume is about Pod
    - name: cache-volume                        #this name should match the name parameter
      emptyDir: {}
hostPath: mounts a file or directory from host to your pod.
hostPath yaml file:
apiVersion: v1
kind: Pod
metadata:
    name: web-server
spec:
    containers:
    - name: nginx
      image: nginx
      volumeMounts:
       - mountPath: "/usr/share/nginx/html"         #volume path in containers
         name: pv-volume
    volumes:
    - name: pv-volume                               #names should match (name in volumes and name in volumeMounts)
      hostPath:
        path: /data                                 #volume path in host
Storage Class:
Creates and Provisions Persistent Volumes dynamically in the background whenever PVC claims it.
Storage Class Yaml file:
apiVersion: storage.k8s.io/v
kind: StorageClass
metadata:
    name: storage-class-name
provisioner: kubernetes.io/aws-ebs              #which provisioner(external or internal(kubernetes.io is internal)) to create PV out of it.
parameters:
    type: io1
    iopsPerGB: "10"
    fsType: ext4
PVC for Storage Class:
apiVersion: v1
kind: PersistentVolumeClaim
metadata:
    name: mypvc
spec:
    accessModes:
    - ReadWriteOnce
    resources:
        requests:
            storage: 100Gi
    storageClassName: storage-class-name
kubectl get pv
Status:
- Available: PV is ready and available to use.
- Bound: PV has been bound to a claim.
- Released: the binding PVC is deleted, and PV is pending reclamation.
- Failed: an error has been encountered.
PVC looks to match a PV with following parametes:
- Access Mode
- StorageClassName
- Capacity of PVC<=PV
ConfigMap
There are 3 ways to define ConfigMap:
- Command line (using environment variable):
$ kubectl create configmap literal-example --from-literal="city=Ann Arbor" --from-literal=state=Michigan
configmap “literal-example” created 2. Pass as Environment variables:
$ cat info/city
Ann Arbor
$ cat info/state
Michigan
$ kubectl create configmap dir-example --from-file=info/
configmap “dir-example” created
- As Config file (using volume):
apiVersion: v1
kind: ConfigMap
metadata:
    name: myconfigMap
data:                           #data: Contains key value pairs of ConfigMap contents.(key: state, value: Michigan)
    state: Michigan
    city: Ann Arbor
Two ways of using ConfigMap in a pod
- Using configMap as key value
spec:
    containers:
    - image: mysql:5.
      env:
        - name: MYSQL_ROOT_PASSWORD
          valueFrom:
            configMapKeyRef:
                name: myconfigMap
                key: state
- Mounting configMap as volumes**
volumeMounts:
    - mountPath: /configmapdir
      name: my-configMap
volumes:
    - name: my-configMap
      configMap:
        name: myconfigMap
List configMaps:
- $ kubectl get cm
- $ kubectl describe cm cm
Secret
Pods access local data through volumes. But sometimes the data should not be local!
Two ways of creating a secret object:
- yaml file
apiVersion: v1
kind: Secret
metadata:
    name: mysec
data:
    password: QWRtaW5AMTEwCg==
- command line
$ kubectl create secret generic mysec #generic: creates secret from a local file/directory
$ kubectl create secret generic mysec --from-literal=password=root #--from-literal sends parametes
Two ways of using secret in a pod
- using secrets via environment variables
spec:
    containers:
    - image: mysql:5.1
      env:
        - name: MYSQL_ROOT_PASSWORD
          valueFrom:
            secretKeyRef:
                name: mysec
                key: password
- mounting secrets as volumes
    volumeMounts:
        - mountPath: /mysqlpassword
          name: mysql
volumes:
    - name: mysql
      secret:
        secretName: mysec
$ kubectl exec -it busybox --cat /mysqlpassword/password
List secrets:
$ kubectl get secret
Services
Service provides a way to expose an application running a set of pods. Clients make request to a service, which routes traffic to its pods load-balanced(by kube-proxy). There isn’t really any physical concept of a service in a cluster.
Service Types:
- ClusterIP (accessible within k8s cluster)
- NodePort (accessible outside k8s cluster)
- LoadBalancer
ClusterIP
We only have port (to access pods) and targetport(to access containers). Cluster IP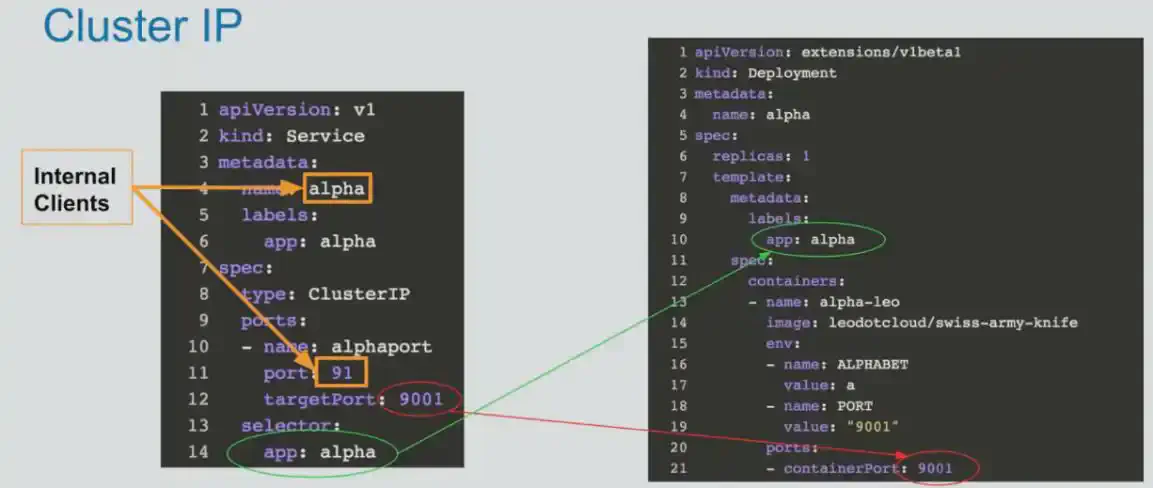
create clusterIP service:
- Yaml file
- Command line:
$ kubectl run pod1 --image=nginx
$ kubectl expose pod pod1 --name=service1 --port=80 --target-port=80 --type=clusterIP

#debug
$ kubectl describe service service
$ kubectl get services
nodePort
just like clusterIP object with different of spec.type = nodePort Nodeport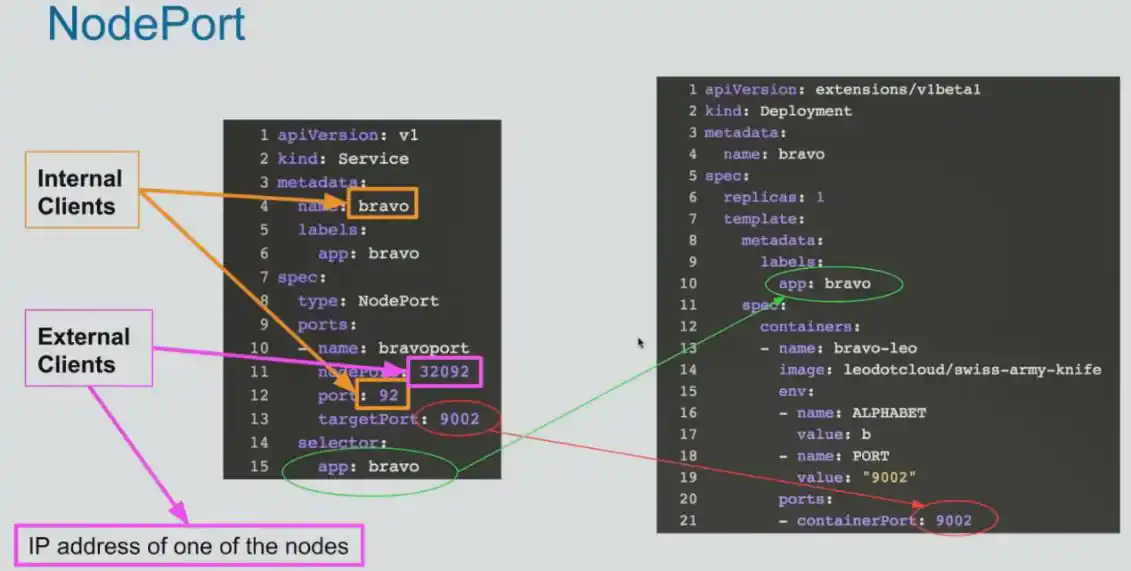
Downsides :
- You can only expose one single service per port
- You can pnly use ports in this range: 30000- 32767
- If the k8s node IP changes, you have to deal with it
LoadBalancer
Exposes apps outside cluster, but use an external cloud loadbalancer to do so. Load Balancer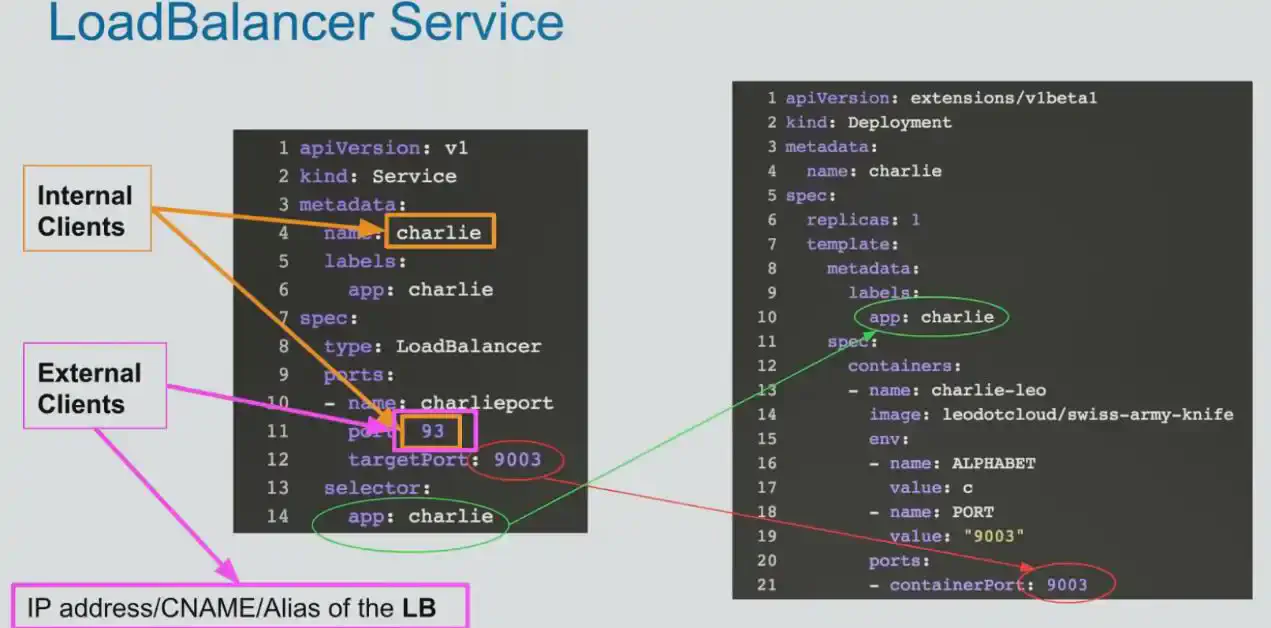
Downside : You need to create a service of type load balancer for each service (meaning you need an IP for each service you want to expose. Note that k8s is not responsible for Service type loadBalancer’s IP. It is an external IP.)
Ingress
History of ingress:
Service in k8s offers you :
- Service discovery
- Load Balancing
- Expose apps
But the problem of service was that services did not have:
- Capabilities of enterprise load balancers like nginx, haproxy, F5, … (e.g the service type Load Balancer only supports round-robin)
- When u create a service of type Load Balancer , and u have a thousand services, the cloud provider charges u with 1000 IPs.(downside of service type LoadBalancer )
Ingress was added to k8s as a load balancer that solves above problems(first openshift solved this problem using openshift routes ). An API object that allows access to your Kubernetes services from outside the Kubernetes cluster. Traffic routing is controlled by rules defined on the Ingress resource. An ingress does not expose arbitrary ports (just 80 & 443).
Ingress only works with web application (http, https). If you have some else app like mongodb and you want to expose it outside of the cluster, you need to have node port running to expose your app. Ingress may provide load balancing , SSL termination & name-based virtual hosting.
flowchart LR
    A@{ shape: "circle", label: "Client" } -. "Ingress-Managed
    Load Balancer" .-> n2 -- "routing rules" --> n3
    n3 -->n4[Pod]
    n3 -->n5[Pod]
	subgraph B["Cluster"]
        n2@{ shape: "rounded", label: "Ingress" }
        n3@{ shape: "rounded", label: "Service" }
        n4
        n5
	end
Ingress Controller: A controller uses Ingress Rules to handle traffic to and from outside the cluster, usually with a load balancer. Ingress Contoller is a load balancer or API Gateway(api gateway offers u additional capabalities). Install Ingress Controller:
$ helm install my-release bitnami/nginx-ingress-controller
$ helm ls
$ kubectl get pod --all-namespaces |grep -I ingress
Types of Ingress:
- Single service: This is Ingress backed by a single service where a single service is exposed. To define this, specify a default backend without any rules.
- Simple fanout: a single entrypoint (IP Address) is used to expose multiple services (based on the http URL being requested).
- Named Based Virtual Hosting: routing http traffic to multiple hostnames at the same IP.
Helm
kubernetes package manager | packages are called “Chart” Helm is a way for packaging kubernetes yaml files & distribute them in public or private registries.
Install:
$curl -fsSL - o get_helm.sh https://raw.githubusercontent.com/helm/helm/main/scripts/get-helm- 3
$chmod 700 get_helm.sh
$./get_helm.sh
Check helm version
$helm version
Add a chart repo:
$helm repo add bitnami https://charts.bitnami.com/bitnami #Get the latest list of charts: $helm repo update
List the charts you can Install:
$helm search repo nginx
Install a chart using Helm:
$helm install bitnami/mariadb --generate-name
List currently deployed repositories:
$helm repo list
List currently deployed charts:
$helm ls
Uninstall a release:
$helm uninstall mariadb- 1645460340
See info about a release:
$helm status mariadb- 1645460340
Scheduling
Two mechanisms to select a node by scheduler:
- Filtering : find nodes that are capable of scheduling → nodes that suit pods requirements.
- Scoring : score nodes selected in the previous step.
Ways to assign a node to a pod
- NodeName: In pod spec.nodename we define name of the node we want directly. Note that if the node doesn’t exist, then the pod will not run.
NodeName yaml example:
apiVersion: v1
kind: Pod
metadata:
    name: nginx
spec:
    containers:
    - name: nginx
      image: nginx
    nodeName: kube- 01
NodeSelector
- Step1: label the node:
$kubectl label node worker1 ntype=html #ntype=key , html= value- Step2: in spec.nodeSelector of pod we define: ntype: html NodeSelector yaml example:
apiVersion: v1 kind: Pod metadata: name: nodeselector-pod spec: nodeSelector: ntype: html containers: - name: nginx image: nginx:1.19.1- Step3: to debug:
$kubectl get node --show-labels- Step4: to delete label of a node:
$kubectl label node worker1 ntypeNodeAffinity: Node Affinity is a more flexible expression to schedule pods on node (over nodeName & …). Two types of nodeAffinity: (required: hard, preferred: soft)
- requiredDuringSchedulingIgnoredDuringExecution:
- requiredDuringScheduling : It says firmly to run pod if the following operator (In, NotIn , Exists, DoesNotExist ) is true.
- IgnoredDuringExecution: when the affinity of a node changes, the pods will continue to run.
- preferredDuringSchedulingIgnoredDuringExecution:
- preferredDuringScheduling : if no matching found, go with the default mechanism of scheduler.
- requiredDuringSchedulingIgnoredDuringExecution:
NodeAffinity yaml example:
apiVersion: v1
kind: Pod
metadata:
    name: with-node-affinity
spec:
    affinity:
        nodeAffinity:
            requiredDuringSchedulingIgnoredDuringExecution:
                nodeSelectorTerms:
                - matchExpressions:
                    - key: ntype
                      operator: In
                      values:
                      - virus
- Taint & toleration: Taint usage: we want to have reserved nodes in the cluster. Toleration allows to run pods on taint nodes. Three taint effects of a node:
- NoSchedule: pod will not be scheduled on rejected nodes.
- PreferNoSchedule: system tries to avoid scheduling pods, but doesn’t guarantee it.
- NoExecute: even pod that is running will be evicted.
To make a node schedulable or UnSchedulable:
$kubectl taint node <NodeName> key=value:<tainteffect>
e.g. taint worker1 with label hold=virus and NoSchedule tainteffect: $kubectl taint nodes worker1 hold=virus:NoSchedule
Yaml file of Pod that tolerates tainted node:
kind: pod
metadata:
    name: nginx
spec:
    toleration:
    - key: “hold”
      operator: “Equal”
      value: “virus”
Make above node schedulable (untaint):
$kubectl taint nodes worker 1 hold=virus:NoSchedule
Retrieve schedulable nodes:
$kubectl describe node <nodename> | grep -i taint

Taints: <none>
#OR
Taints: node-role.kubernetes.io/master:NoSchedule
Retreieve taint state of all nodes:
$kubectl describe node | grep -i taint
T-Shoot
- If the k8s API Server is down, we get following error:T-Shoot:
$kubectl get nodes The connection to the server localhost:6443 was refused - did you specify the right host or port?- Is docker service and kubelet running on all nodes of cluster?
- Check whether the API server is down in /etc/kubernetes/manifests/kube-apiserver.yaml
- Check system pods:
$kubectl get pods -n kube-system
- Read logs:
$journalctl -u kubelet
$journalctl -u docker
- See /var/logs directory:
/var/logs/kube-apiserver.log
/var/logs/kube-scheduler.log
/var/logs/kube-controller-manager.log
- See logs inside a container:
$kubectl logs podName -c ContainerName
- Check DNS and kube-proxy: there is an image named nicolaka/netshoot that have tools for network tshoot:
$kubectl run tmp-shell --rm -i --tty --labels "app=test00" --image nicolaka/netshoot --/bin/bash
DNS in Kubernetes
CoreDNS: CoreDNS is the DNS Server in kubernetes cluster. It creates a record for a service so each pod “in the cluster” can reach the service by its name. CoreDNS has 2 replica pods in “kube-system” namespace for redundancy.
T-shoot DNS issues in cluster:
$kubectl get pods -n kube-system --show-labels #to see CoreDNS labels
$kubectl logs -n kube-system -l k8s-app=kube-dns #to see logs of both coreDNS pods (k8s-app=kube-dns is the coreDNS label)
Test coreDNS:
kubectl get svc -n kube-system | grep dns #the result shows the service of coreDNS pods and its IP.- Go to the container of the pod & check : /etc/resolve.conf —> The IP address of the nameserver is equal to ip address above.
FQDN : Fully Qualified Domain Name
When we want to talk to services in the same namespace: only name of service is required (e.g: myservice)
When we want to talk to services in the different namespace: we must include namespace as well (e.gmyservice.default)
Health Checking
Pod Lifecycle
- Running: The Pod has been bound to a node, and all of the containers have been created. At least onecontainer is still running, or is in the process of starting or restarting.
- Terminate: the pod’s goal is to change a configFile or create a directory or …, then it gets terminated.
- Succeed: All containers in the Pod have terminated in success, and will not be restarted.
- Failed: All containers in the Pod have terminated, and at least one container has terminated in failure. Thatis, the container either exited with non-zero status or was terminated by the system.
Probes in k8s
There are three types of probes to check if the pod is started and succeeded correctly.
- Readiness : to check inside my pod if the Entrypoint or CMD commands are working correctly. to check inside Pod, we have 3 types of apps:
- HTTP or HTTPS apps: they serve something based on HTTP (or HTTPS). we then receive 200 or 300. (the URLcalled returns 2XX or 3XX status code). This all means that the app inside pod is run correctly.
- Apps are TCP: they listen on a port. (they are not HTTP). K8s will telnet the port (inside Pod) and if it cantelnet, it means the port is open and app inside Pod is working correctly.
- App is not HTTP or TCP: (for instance its UDP). we can run a command inside the container and expect toreturn 0 (exit status).
Liveness :
Check containers status (Readiness checks Pod status). When something is wrong with livenessProbe, it means that the app has a problem in container layer.
Startup :
Startup probes were introduced for Java apps first. But now it has a different definition. It is usedwhen time for starting your app is unusual (e.g Java apps, that jar file takes a long time to start).
Check Health Parameters
- Check Interval: every what second should I call URL? (url for HTTP apps)
- Initial Delay: time needed to start up container until calling my app. time for all processes needed to startyour app.
- Success Threshold: In your check Interval, if your app succeeded 1 time (if set to 1), my app is startedcorrectly. now kubeproxy can route network to new Pod.
- Failed Threshold: when my app is failed up to Failed Threshold times (3 for example), it is in Failed State.
ETCD
Backup ETCD
ETCDCTL_API=3 etcdctl --endpoints=https://127.0.0.1:2379 \
--cacert=<trusted-ca-file> --cert=<cert-file> --key=<key-file> \
snapshot save <backup-file-location>
Use above certificates from below command:
$cat /etc/kubernetes/manifests/etcd.yaml | grep /etc/kubernetes/pki/
Example of backup from etcd:
$ETCDCTL_API=3 etcdctl --endpoints="https://192.168.4.42:2379" --cacert=/etc/kubernetes/pki/etcd/ca.crt \
--cert=/etc/kubernetes/pki/etcd/server.crt --key=/etc/kubernetes/pki/etcd/server.key \
snapshot save /etc/data/etcdsnapshot.db
Verify the Snapshot: We don’t need authentication for below command:
ETCDCTL_API=3 etcdctl --write-out=table snapshot status <backup-file-location>
Restore ETCD
Example of restore from etcd:
sudo ETCDCTL_API=3 etcdctl snapshot restore /home/cloud_user/etcd_backup.db \
--initial-cluster etcd-restore=https://10.0.1.101:2380 \
--initial-advertise-peer-urls https://10.0.1.101:2380 \
--name etcd-restore \
--data-dir /var/lib/etcd
Verify Restore:
kubectl get all
Security (CKS)
Access to K8s API:
flowchart LR
    A --> B
    C --> B
    B --> D
    D --> E
    E --> F

	subgraph B ["Authentication"]
		n2
	end

    subgraph D ["Authorization"]
		n3
	end

subgraph E ["Admission Control"]
		n4
	end

subgraph F ["Kubernetes Objects"]
		n5[" "]

	end
    A@{ shape: "circle", label: "Human User (kubectl)" }
	C@{ shape: "circle", label: "Pod (Service Account)" }
    n2@{ shape: "text", label: "Checks whether the requester is a valid user who can access the cluster" }
    n3@{ shape: "text", label: "Checks whether user is authorized to perform requested actions" }
	n4@{ shape: "text", label: "Checks whether request is secure and compliant" }
	n5@{ shape: "cyl" }
Authentication
Both human users and Kubernetes service accounts can be authorized for API access. Whenever we call API (with kubectl command), we are authenticated.
The API serves on port 443, and all k8s components are protected by TLS with API.
Authentication Mechanisms: There are different authentication mechanisms that can be configured: certificates, password, and plain tokens, bootstrap tokens, and JSON Web Tokens (used for service accounts). each one is tried in sequence, until one of them succeeds. If the request cannot be authenticated, it is rejected with HTTP status code 401.
Authorization
After the request is authenticated as coming from a specific user, the request must be authorized. A request must include the username of the requester, the requested action, and the object affected by the action. The request is authorized if an existing policy declares that the user has permissions to complete the requested action.
##Authorization Mechanisms: Node Authorization, Attribute-based Authorization (ABAC), Role-Based Authorization (RBAC)
TLS Certificates
TLS Certificate is a way to establish secure communication between client & server using SSL/TLS protocol.
Certificates are used within a cryptographic system known as a public key infrastructure (PKI).
Asymmetric encryption: we have a key pair (public,private) to encrypt & decrypt data.
Certificate Authority: there is an organization called Certificate Authority (CA) which gives website owners a certificate that certifies the ownership of website. The owner of website asks CA to prove that their public key is really for the website. And this CA issues a certificate which has: public key, name of the website & subdomains and the signature of the CAs.
OpenSSL: with this tool we have public & private key but we want the public key to be certified by a trusted CA. This whole process is called PKI (Public Key Infrastructure).
In kubernetes, every component that talks to API-Server needs to provide a certificate to authenticate itself with API-Server. We generate a self-signed CA Certificate for k8s. we use it to sign all the client & server certificates with it (all these certificates are stored in /etc/kubernetes/pki)
RBAC
Role-Based Access Control. RBAC is one of the multiple Authorization methods. RBAC is a mechanism that enables you to configure set of permissions that define how a user can interact with any k8s object in cluster or particular namespace.
It consists of 3 parts:
- Service Account : Provides an Identity for processes that run in a Pod.ServiceAccount yaml file:
apiVersion: v1
kind: ServiceAccount
metadata:
    name: my-serviceaccount
- List SAs in current namespace:
$kubectl get sa
- List SAs in all namespaces:
$kubectl get sa --all-namespaces
- Create an SA in Imperative mode:
$kubectl create sa p1
- Create an SA in declarative mode:
$kubectl create sa sa-test1 --dry-run=client -o yaml
- Role/ClusterRole: They are k8s objects that define set of permissions. Role is in the scope of a Namespace. ClusterRole is in the scope of cluster.
$ kubectl create clusterrole pvviewer-role --resource=pods --verb=list
Role yaml file:
apiVersion: rbac.authorization.k8s.io/v1
kind: Role
metadata:
    namespace: default  #namespace where the role belongs to
    name: pod-reader
rules:
    - apiGroups: [""]   # "" indicates the core API group(there are other apiGroups like apps including pods,deployments,… e.g deployments.apps)
    resources: ["pods"] #indicates the resources that this role are for
    verbs: ["get", "watch", "list"] #verbs that we can do on above resources
- RoleBinding/ClusterRoleBinding : objects that Connect roles or ClusterRoles to users.
$ kubectl create clusterrolebinding pvviewer-role-binding --clusterrole=pvviewer-role --serviceaccount=test1:p1
$ kubectl get rolebinding
$ kubectl get clusterrolebinding
You can check API Access with auth can-i subcommand:
$ kubectl auth can-i create deployments -n my-namespace
RoleBinding yaml file:
apiVersion: rbac.authorization.k8s.io/v1
kind: RoleBinding       # This role binding allows "jane" to read pods in the "default" namespace.
metadata:
    name: read-pods
    namespace: default
subjects:               # You can specify more than one "subject"
    - kind: User
    name: jane          #"name" is case sensitive
    apiGroup: rbac.authorization.k8s.io
roleRef:                #"roleRef" specifies the binding to a Role / ClusterRole
    kind: Role          #this must be Role or ClusterRole
    name: pod-reader    # this must match the name of the Role or ClusterRole you wish to bind to
    apiGroup: rbac.authorization.k8s.io
Admission Control
Admission Control modules are software modules that can modify or reject requests.
There is a flag in API Server called enable-admission-plugins. This flag calls a list of admission control plugins before modifying objects in k8s cluster.
Admission Control plugins:
AlwaysAdmit #all pods come inside cluster
AlwaysPullImage #all new pods are modified to imagePullPolicy: Always
Commands:
$ kube-apiserver --enable-admission-plugins=LimitRanger #enable limitRanger admission control plugin
$ grep admission /etc/kubernetes/manifests/kube-apiserver.yaml #view current admission controller setting
Security Context
Pods and containers within pods can be given specific security constraints to limit what processes running in containers can do. Example: in the below example, we force a policy that containers can`t run as root users:
apiVersion: v1
kind: Pod
metadata:
    name: nginxseccontext
spec:
    securityContext:
        runAsNonRoot: true
containers:
    - image: nginx
    name: nginx
Network Policy
- By default, all pods can reach each other (all ingress and egress traffic is allowed).
- We had ingress object before, but the NetworkPolicy objects define rules for both ingress and egress.
- In fact, NetworkPolicy configures CNI application (weavenet, canal, calico).
- Note that not all plugins support NetworkPolicies(e.g: flannel)
As mentioned in the introduction, Kubernetes network policies identify traffic sources and destinations by label selector only – there is no provision (as yet) to specify IP addresses or masks. Ingress is incoming traffic to the pod, and egress is outgoing traffic from the pod.
Create Ingress Policy:
Policies can include one or more ingress rules. To specify which pods in the namespace the network policy applies to, use a pod selector. Within the ingress rule, use another pod selector to define which pods allow incoming traffic, and the ports field to define on which ports traffic is allowed.
Example: Allow ingress traffic from pods in the same namespace In the following example, incoming traffic to pods with label color=blue are allowed only if they come from a pod with color=red, on port 80.
kind: NetworkPolicy
apiVersion: networking.k8s.io/v1
metadata:
    name: allow-same-namespace
    namespace: default
spec:
    podSelector: #if empty, NetworkPolicy is applied to all pods in defined namespace.
    matchLabels:
        color: blue
    ingress:
        - from:
            - podSelector:
                matchLabels:
                    color: red
        ports:
            - port: 80
Example: Allow ingress traffic from pods in a different namespace. In the following example, incoming traffic is allowed only if they come from a pod with label color=red, in a namespace with label shape=square, on port 80.
kind: NetworkPolicy
apiVersion: networking.k8s.io/v1
metadata:
    name: allow-same-namespace
    namespace: default
spec:
    podSelector:
        matchLabels:
            color: blue
    ingress:
        - from:
            - podSelector:
                matchLabels:
                    color: red
            namespaceSelector:
                matchLabels:
                    shape: square
        ports:
            - port: 80
Create egress policy:
Example: Allow egress traffic from pods in the same namespace. The following policy allows pod outbound traffic to other pods in the same namespace that match the pod selector. In the following example, outbound traffic is allowed only if they go to a pod with label color=red, on port 80.
kind: NetworkPolicy
apiVersion: networking.k8s.io/v1
metadata:
    name: allow-egress-same-namespace
    namespace: default
spec:
    podSelector:
        matchLabels:
            color: blue
    egress:
        - to:
            - podSelector:
                matchLabels:
                    color: red
            ports:
                - port: 80
Example: Allow egress traffic to IP addresses or CIDR range. Egress policies can also be used to allow traffic to specific IP addresses and CIDR ranges. Typically, IP addresses/ranges are used to handle traffic that is external to the cluster for static resources or subnets. The following policy allows egress traffic to pods in CIDR, 172.18.0.0/24.
kind: NetworkPolicy
apiVersion: networking.k8s.io/v1
metadata:
    name: allow-egress-external
    namespace: default
spec:
    podSelector:
        matchLabels:
            color: red
    egress:
        - to:
            - ipBlock:
                cidr: 172.18.0.0/24
Example: Create deny-all default ingress and egress network policy
kind: NetworkPolicy
apiVersion: networking.k8s.io/v1
metadata:
    name: default-deny
    namespace: default
spec:
    podSelector:
        matchLabels: {}
    policyTypes:
        - Ingress
        - Egress