Bitwarden on Google Cloud for Free
Self-hosting bitwarden instance on google cloud for exactly 0 currency
2701 Words | Reading Time: 12 Minutes, 16 Seconds
05-11-2022 12:00 AM UTC
Today we will host Bitwarden on Google Cloud. This setup costs exactly $0 and would be so, until Google Cloud decides something drastic. Following section will be updated if any breaking changes are made and how to mitigate them.
Changes
Inital Post : 13-12-2021
Update On : 05-11-2022
Some people might want to have a simpler docker-compose file for this. I have created the same and added here. This uses SQLite version for nginx proxy manager, which is sufficient for running 1-3 containers.
To stop and remove images, docker-compose down --rmi local
Now the docker-compose file:
| |
Introduction : Important Stuff
Google Cloud provides 1 non-preemptible e2-micro VM instance per month:
- Regions:
- Oregon: us-west1
- Iowa: us-central1
- South Carolina: us-east1
- 30 GB-months standard persistent disk
- 5 GB-month snapshot storage in the following regions:
- Oregon: us-west1
- Iowa: us-central1
- South Carolina: us-east1
- Taiwan: asia-east1
- Belgium: europe-west1
- 1 GB network egress from North America to all region destinations (excluding China and Australia) per month
Requirement of URL- Bitwarden recommends a URL configured with it. This is not strictly requirement, however it will smoothen next steps, as we will see.
Step 1 : Getting a free Domain
First we need a domain. Since we are targeting the maximum of $0, we will use domains provided by Freenom.
Create an account in freenom. In my experience, using Google/Outlook emails is faster while creating the account, as freenom service isn’t fastest in the world. You will able to get free domains of TLDs .tk, .ml, .ga, .cf and .gq.
On the main page, search for your domain. Make sure that the domain is sufficiently long (more than 10 characters). You will get the screen below.
Freenom Domain chooser page
Click on “Get it now!” and follow the on-screen instructions to register the domain in your account.
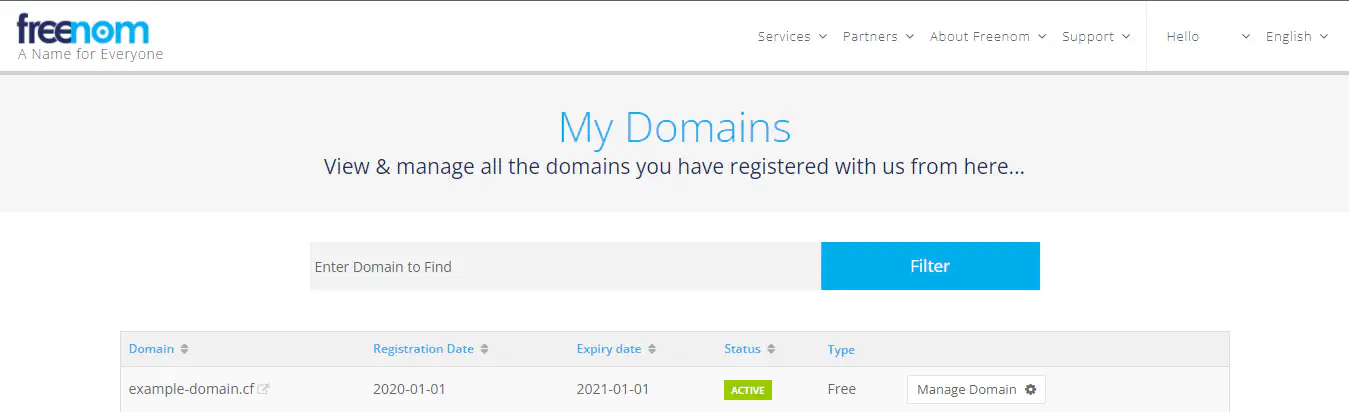
Go to My Domains to view the newly acquired domain.
Manage My Domains
Click on Manage Domain on the right to manage that particular domain. For this, you have to be familiar with the nameserver section of the management page.
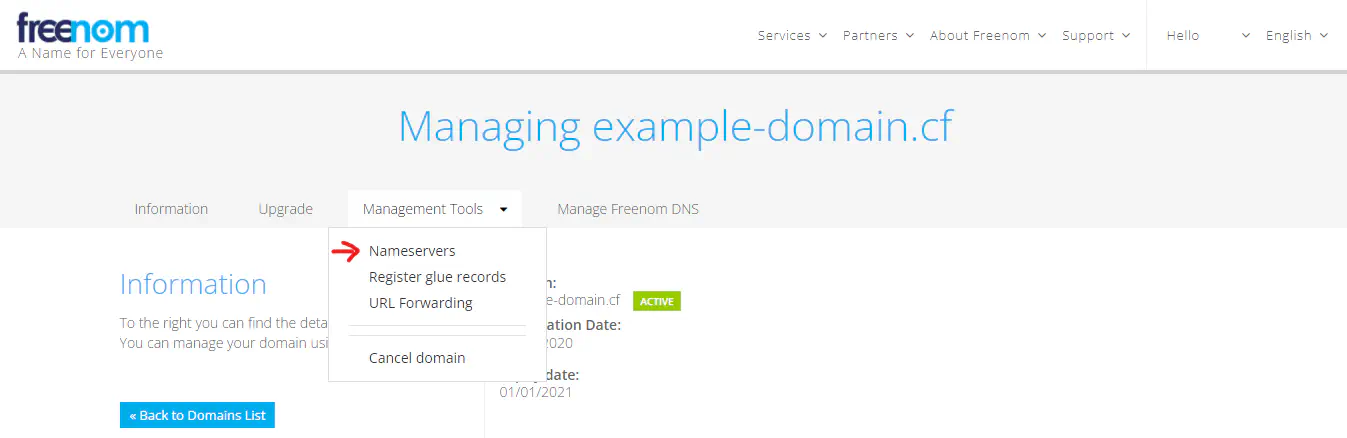
Manage Nameservers
Freenom’s DNS propagation is slow as fuck. I had to wait for 7 days for DNS propagation to be completed.
To verify DNS propagation, run the following command on any linux based operating system. If the DNS propagation is not finished, you will get following response.
$ dig example-domain.cf

; <<>> DiG 9.16.1-Ubuntu <<>> example-domain.cf
;; global options: printcmd
;; Got answer:
;; ->>HEADER<<- opcode: QUERY, status: NXDOMAIN, id: 8376
;; flags: qr rd ra; QUERY: 1, ANSWER: 0, AUTHORITY: 1, ADDITIONAL: 1

;; OPT PSEUDOSECTION:
; EDNS: version: 0, flags:; udp: 512
;; QUESTION SECTION:
;example-domain.cf. IN A

;; AUTHORITY SECTION:
cf.                     5       IN      SOA     a.ns.cf. kohilaire.socatel.cf. 1638650493 10800 3600 604800 5

;; Query time: 210 msec
;; SERVER: 172.21.0.1#53(172.21.0.1)
;; WHEN: Sun Jan 05 00:00:10 GMT 2021
;; MSG SIZE  rcvd: 127
Lines beginning with ; are comments that are not part of the information received from the DNS server, but they do reflect some of the low-level protocol used in making the query.
The first two lines tell us the version of dig (9.16.1), the command line parameters (example-domain.cf) and the query options (printcmd). The printcmd option means that the command section (the name given to these first two line) is printed. You can turn it off by using the option +nocmd.
Next, dig shows the header of the response it received from the DNS server. Here it reports that an answer was obtained from the query response (opcode: QUERY) and the response contains one answer, and one piece of information in the authority section and additional section. The flags are used to note certain things about the DNS server and its response; for example, the RA flag shows that recursive queries are available.
Next comes the question section, which simply tells us the query, which in this case is a query for the A record of example-domain.cf. The IN means this is an Internet lookup (in the Internet class).
Along with the IP address the DNS record contains some other useful information. The authority section contains a list of name servers that are responsible for the domain name — those that can always give an authoritative answer. Here we find one name server listed, which are the name servers of the company with which the domain was registered. To save an extra lookup, dig lists the IP addresses of those name servers in the additional section.
Lastly there are some stats about the query.
Once the wait is over we can protect our domain.
Step 2 : Protecting the Domain
Since we are using various of constraints, we have to take care of protecting our domain from any malicious actors. Hence, we will be using Cloudflare.
Cloudflare provides content delivery network and DDoS mitigation services. Its services occur between a website’s visitor and the Cloudflare customer’s hosting provider, acting as a reverse proxy for websites. Also, it provides a free account for our domains and a relatively fast DNS than Freenom, which we would be using. Start with creating an account on Cloudflare.
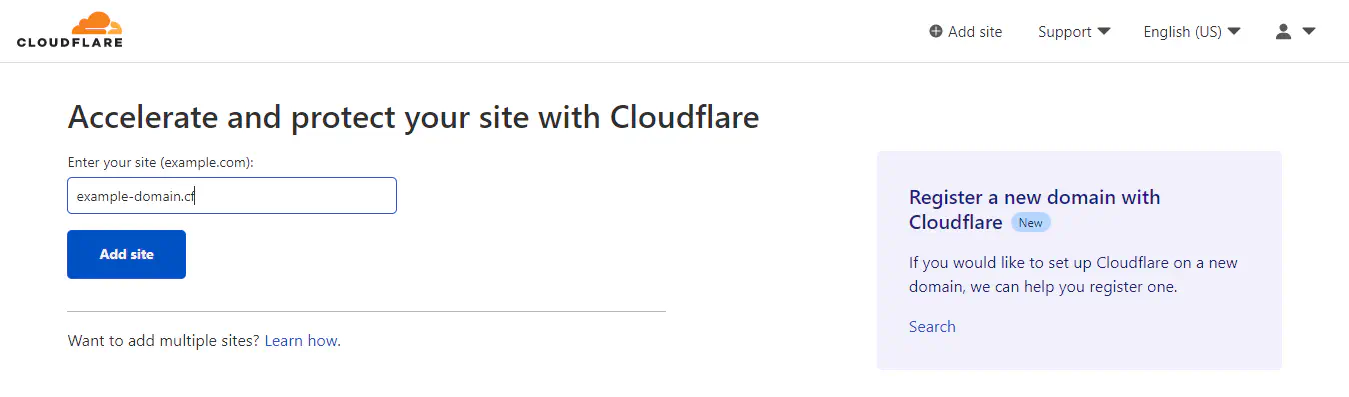
Click on “Add a Site” and enter the domain in the textbox. After that click on “Add site”.
Add Domain to Cloudflare
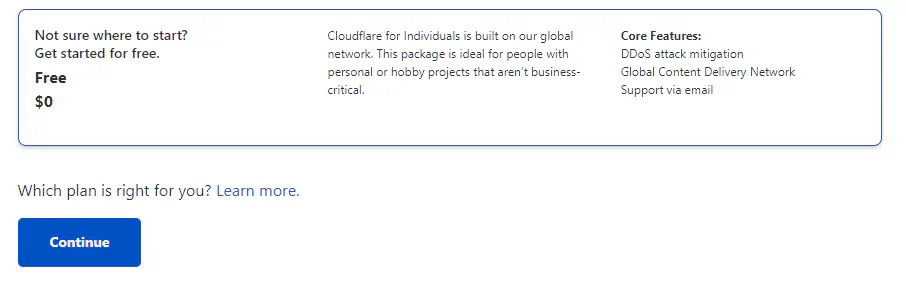
Select “Get started for free” (Located at the bottom of the page) and select Continue.
How to get to free tier form Cloudflare
Review DNS records and select on Continue. Next, “Change your nameservers” section, you will find following section.

Get Cloudflare nameservers to manage your domain
Find the management page on Freenom and replace the nameservers with the Cloudflare’s nameservers. It is like sophia.ns.cloudflare.com After that, wait for few moments and click on “Done, check nameservers”. It usually takes 24-48 hours for updates. So, have a nice sleep for 2-3 days.
Step 3 : Configuring Google Cloud
After the DNS propagation is complete. We can go and setup Googlr Cloud Instance. We will be using Always free tier. Create a Google Cloud account for yourself. If you are a new user, you will be given $200 credit for trying out the services. But, since we are certified long-term free-loader, we will ignore that offer. You will be asked to enter your Credit Card details and maybe asked to re-verify. If your country allows it we can use Debit Cards also. But, don’t panic as apart from small refundable amount, no additional charges will be leived.
Once your cloud account is activated and billing is in place, you can go ahead and startup Cloud Shell (located on the top ribbon, 4th icon from left).

Google Cloud Console top panel
Go to Google Compute Engine and open a Cloud Shell. You may also create the instance manually following the constraints of the free tier. In the Cloud Shell enter the following command to build the properly spec’d machine:
| |
You may change the zone to be closer to you or customize the name (bitwarden), but most of the other values should remain the same. Once the instance is started, login to the instance via SSH. Once in the instance, create a file install-alias.sh. You can do so via
vi install-alias.sh
This will open Vi editor. Enter I go move to insert mode. Copy the below code box and paste in the editor.
| |
When done, press Esc and then type :wq to save and exit the editor. Now in the terminal type in chmod u+x install-alias.sh. This will mark this file as executable.
Set up the docker-compose alias by using the included script:
sh install-alias.sh
source ~/.bashrc
When done, enter following code, it will fetch docker-compose container and will show below output.
$ docker-compose --version

docker-compose version 1.26.2, build eefe0d3
Now create a new folder: mkdir google-cloud
Create a file: vi docker-compose.yaml and copy-paste below contents into the editor.
Change all the instances where changeme is mentioned to a strong username/password and set ADMIN_TOKEN for Bitwarden instance using the command openssl rand -base64 48.
| |
Now, exit out of editor and run the docker-compose file by running
| |
It will fetch all the necessary images and will setup the apps for you. When you will type in docker ps -a, it should show three containers like below.
$ docker ps -a

CONTAINER ID   IMAGE                             COMMAND                  CREATED       STATUS                 PORTS                                                                                  NAMES
48xxxxxxxxxx   vaultwarden/server:latest         "/usr/bin/dumb-init …"   2 weeks ago   Up 2 weeks (healthy)   80/tcp, 3012/tcp                                                                       bitwarden
a1xxxxxxxxxx   jc21/nginx-proxy-manager:latest   "/init"                  2 weeks ago   Up 2 weeks             0.0.0.0:80-81->80-81/tcp, :::80-81->80-81/tcp, 0.0.0.0:443->443/tcp, :::443->443/tcp   nginxproxy_app_1
e4xxxxxxxxxx   jc21/mariadb-aria:latest          "/scripts/run.sh"        2 weeks ago   Up 2 weeks             3306/tcp                                                                               nginxproxy_db_1
At this stage, you can check your system performance. Load should be negligible and you should have 50% free memory for other stuffs to containerize, if you please.
$ w

 06:37:34 up 17 days, 16:21,  1 user,  load average: 0.00, 0.00, 0.00
USER     TTY        LOGIN@   IDLE   JCPU   PCPU WHAT
user1 pts/0     06:37    6.00s  0.00s  0.00s w

$ free -h
              total        used        free      shared  buff/cache   available
Mem:          976Mi       361Mi       394Mi       1.0Mi       220Mi       487Mi
Swap:            0B          0B          0B
Now, we need to open port 81 for us to use. Google Cloud, by default, doesn’t open port 81. We have to open it ourselves. Click on ’nic0’ available on Instances List, just right of Internal IP. Click on ‘Firewall’ section on left bar as shown below.
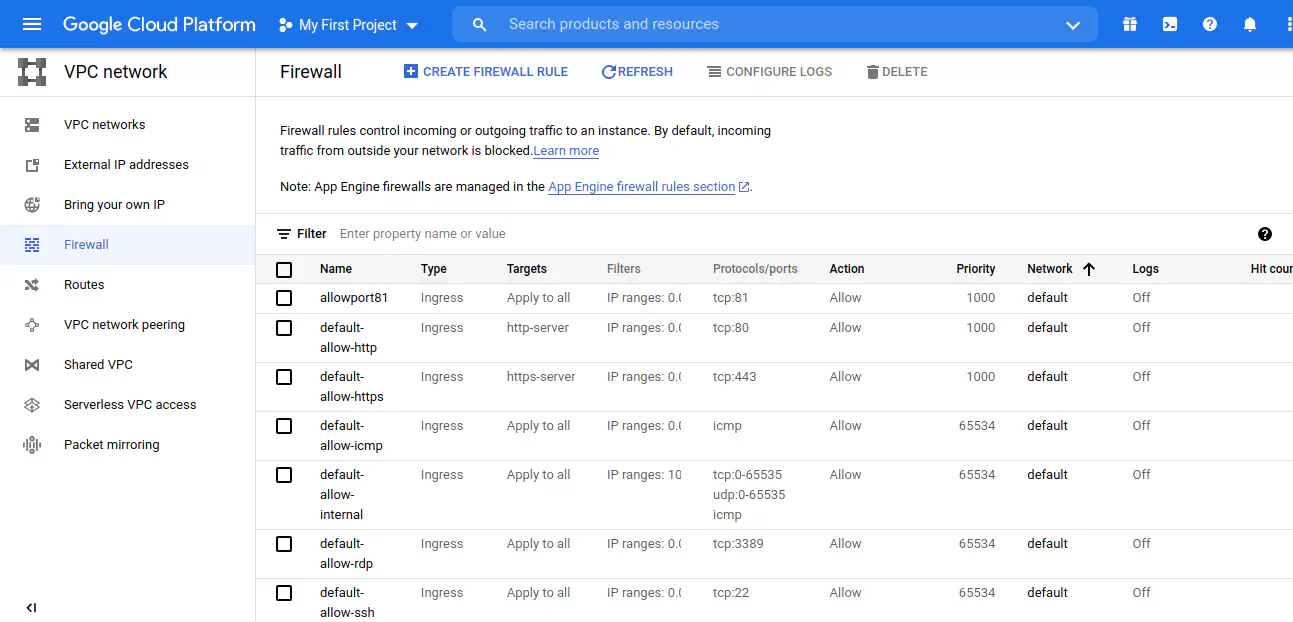
Google Cloud Firewall Page to open port 81
Click on ‘Create Firewall Rule’, and follow the options as given below.
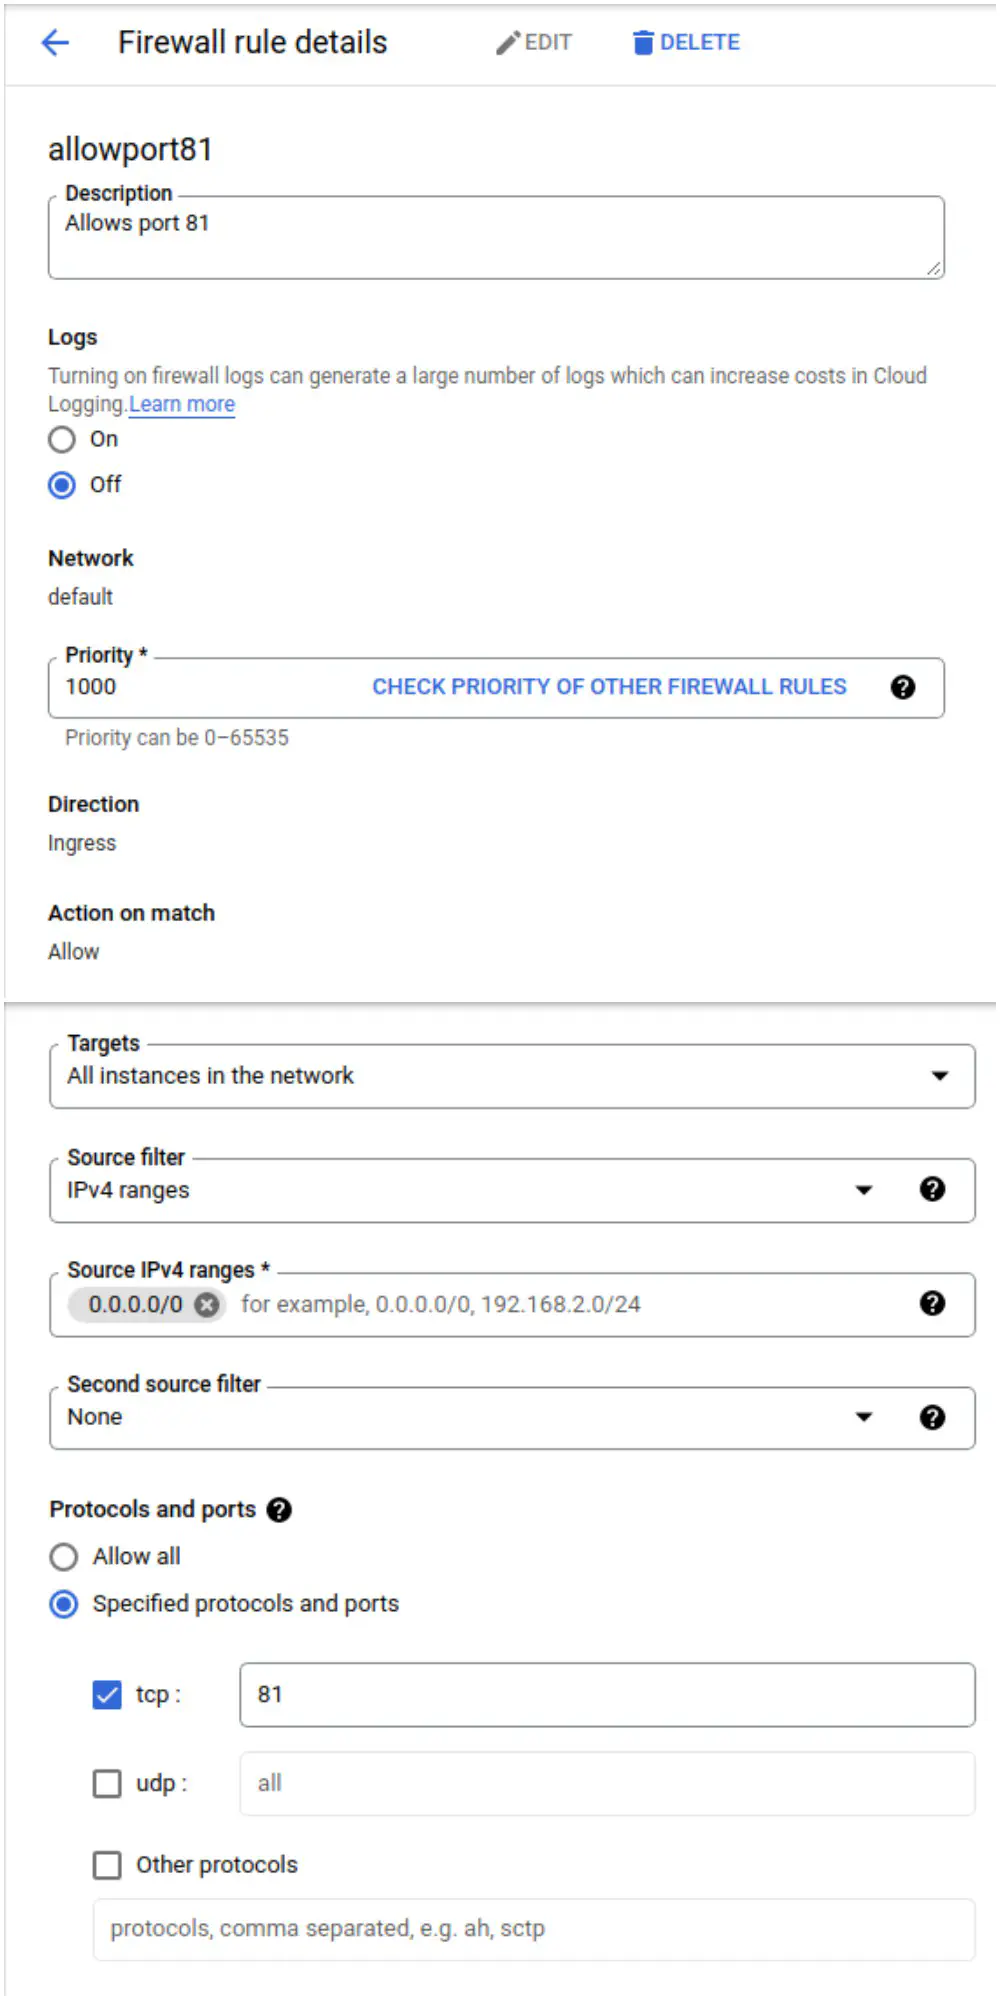
Google Cloud Firewall Page to open port 81 and apply to instance
When done, click on “Save”.
Now, login to Cloudflare and copy the ‘External IP’ from Instances list and paste as ‘A record’. Mark the check to resolve it ‘DNS Only’.
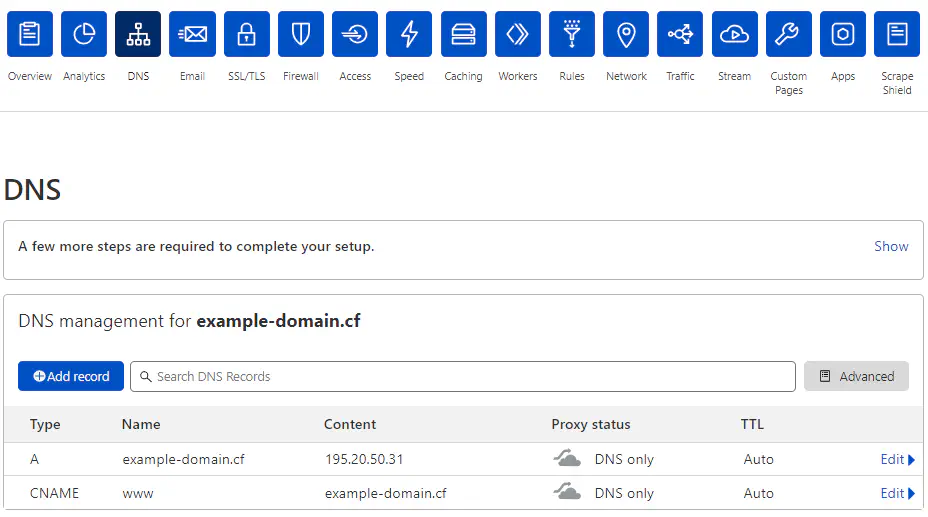
Change A record on Cloudflare Dashboard
Copy the ‘External IP’ and paste it on a new browser tab follows by :81. So it will be http://<External IP>:81. You will be presented with following screen.
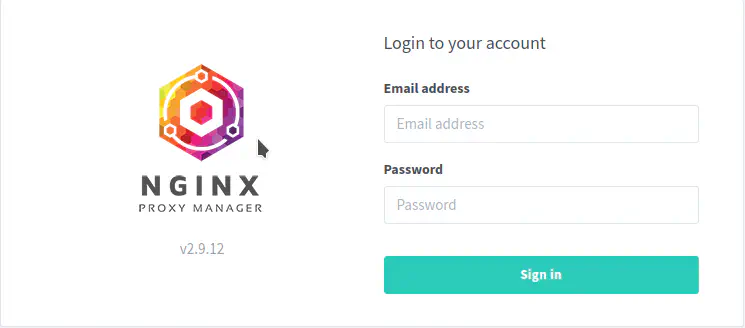
Nginx Proxy Manager login page
Immediately after logging in with this default user you will be asked to modify your details and change your password.
Click on ‘Proxy Hosts’ and then click on ‘Add Proxy Host’. You will be presented with following screen. Fill up the form with the domain you chose on Step 1.
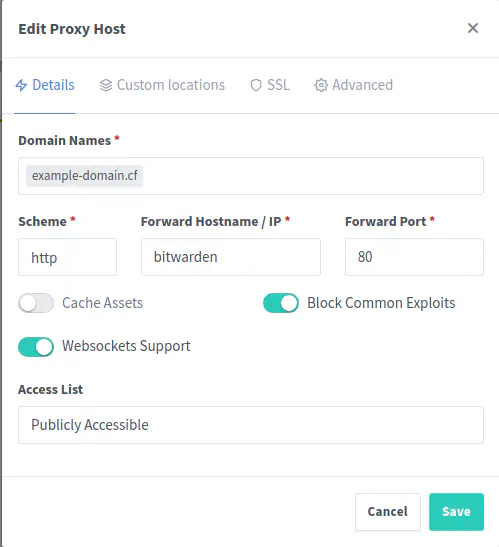
Setup Bitwarden to use SSL and dedicated domain
Click on SSL tab and fill-up the domain again (if not already autofilled) and check on ‘Force SSL’ and click on ‘Save’. Nginx will fetch SSL certificate from Let’s Encrypt and setup traffic to your Bitwarden Instance.
Upon retrying dig example-domain.cf, you should get comparable result, with ANSWER as Google Cloud external IP.
$ dig example-domain.cf

; <<>> DiG 9.16.1-Ubuntu <<>> example-domain.cf
;; global options: printcmd
;; Got answer:
;; ->>HEADER<<- opcode: QUERY, status: NOERROR, id: 51043
;; flags: qr rd ad; QUERY: 1, ANSWER: 1, AUTHORITY: 0, ADDITIONAL: 0
;; WARNING: recursion requested but not available

;; QUESTION SECTION:
;example-domain.cf.             IN      A

;; ANSWER SECTION:
example-domain.cf.      0       IN      A       195.20.50.31

;; Query time: 110 msec
;; SERVER: 172.21.0.1#53(172.21.0.1)
;; WHEN: Sun Dec 05 00:00:31 UTC 2021
;; MSG SIZE  rcvd: 68
Lastly, go to Cloudflare Firewall rule and set following to deny access to Australia and China.
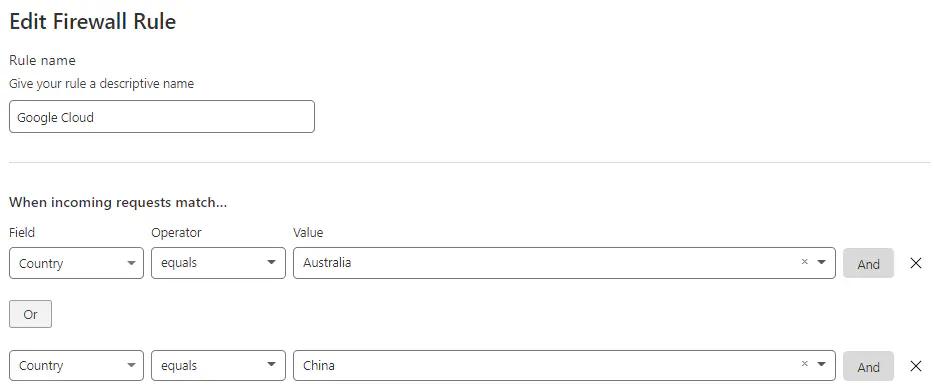
Setup deny for China and Australia
Click on ‘Save’ and close the tab.
Now, when you will go to the URL(in a new tab), you should see this screen. Go ahead and create an account and save all your passwords like it’s nobody’s business.
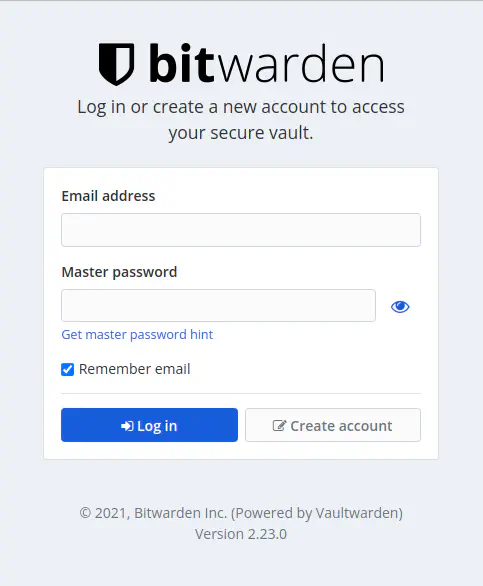
Bitwarden (Vaultwarden) Login Screen
Step 4 : Additional settings
Here are few additional settings from Cloudflare. It is totally optional, but it is better to change them (if not already changed).
Your SSL/TLS encryption mode(Encrypts end-to-end, using a self signed certificate on the server) - Full
Always Use HTTPS(Redirect all requests with scheme “http” to “https”. This applies to all http requests to the zone) - On
Opportunistic Encryption(Opportunistic Encryption allows browsers to benefit from the improved performance of HTTP/2 by letting them know that your site is available over an encrypted connection. Browsers will continue to show “http” in the address bar, not “https”) - On
TLS 1.3(Enable the latest version of the TLS protocol for improved security and performance.) - On
Automatic HTTPS Rewrites(Automatic HTTPS Rewrites helps fix mixed content by changing “http” to “https” for all resources or links on your web site that can be served with HTTPS) - On
Brotli(Speed up page load times for your visitor’s HTTPS traffic by applying Brotli compression) -On
Rocket Loader™(Improve the paint time for pages which include JavaScript) -On
Caching Level(Determine how much of your website’s static content you want Cloudflare to cache. Increased caching can speed up page load time) - Standard
Browser Cache TTL(Determine the length of time Cloudflare instructs a visitor’s browser to cache files. During this period, the browser loads the files from its local cache, speeding up page loads) - 4 Hours
Always Online™(Keep your website online for visitors when your origin server is unavailable. Always Online serves limited copies of web pages to users instead of errors when your server is unreachable) - Off
Crawler Hints(Crawler Hints provide high quality data to search engines and other crawlers when sites using Cloudflare change their content. This allows crawlers to precisely time crawling, avoid wasteful crawls, and generally reduce resource consumption on origins and other Internet infrastructure) -Off
0-RTT Connection Resumption(Improves performance for clients who have previously connected to your website) - Off
WebSockets(Allow WebSockets connections to your origin server.
Concurrent connection guidelines for your plan: low) - On
Onion Routing(Onion Routing allows routing traffic from legitimate users on the Tor network through Cloudflare’s onion services rather than exit nodes, thereby improving privacy of the users and enabling more fine-grained protection) - Off
Pseudo IPv4(Adds an IPv4 header to requests when a client is using IPv6, but the server only supports IPv4) -Off (Only if you don’t use IPv6)
IP Geolocation(Include the country code of the visitor location with all requests to your website) -On
Email Address Obfuscation(Display obfuscated email addresses on your website to prevent harvesting by bots and spammers, without visible changes to the address for human visitors) -On
Server-side Excludes(Automatically hide specific content from disreputable visitors) -On
Hotlink Protection(Protect your images from off-site linking) -On